# Setup in your Azure
Here is a guide on how to connect your credentials to NetBook.
We wish to simplify the process so that you would need minimal intervention from your IT teams.
### **Create an Azure AD Application:**
1. Sign in to your Azure Account through the [Azure portal](https://portal.azure.com/).
2. Select **Azure Active Directory**.
3. Select **App registrations**.
4. Select **New registration**.
5. Name the application. Select a supported account type, which determines who can use the application. You've created your Azure AD application and service principal.

You've created your Azure AD application and service principal.
### Configure the application to access web API:
1. Sign in to the [Azure portal](https://portal.azure.com/).
2. If you have access to multiple tenants, use the **Directory + subscription** filter  in the top menu to select the tenant containing your client app's registration.
3. Select **Azure Active Directory** > **App registrations**, and then select your client application (*not* your web API).
4. Select **API permissions** > **Add a permission** > **Microsoft APIs**.
5. Select the **Azure Service Management** -> Check **user\_impersonation.**
6. Select **Add permissions** to complete the process.
After adding permissions to your API, you should see the selected permissions under **Configured permissions**.

You might also notice the *User.Read* permission for the Microsoft Graph API. This permission is added automatically when you register an app in the Azure portal.
For Authentication, we need to create application secret.
### Create a new application secret
1. Select **Azure Active Directory**.
2. From **App registrations** in Azure AD, select your application.
3. Select **Certificates & secrets**.
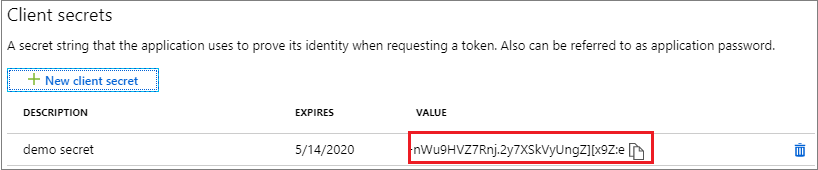
4. Select **Client secrets -> New client secret**.
5. Provide a description of the secret, and a duration. When done, select **Add**.
After saving the client secret, the value of the client secret is displayed. Copy this value because you won't be able to retrieve the key later. You will provide the key value with the application ID to sign in as the application. Store the key value where your application can retrieve it.
### **Create resource groups:**
1. Sign in to the [Azure portal](https://portal.azure.com/).
2. Select **Resource groups**

3\. Select **Add**.
4\. Enter the following values:
* **Subscription**: Select your Azure subscription.
* **Resource group**: Enter a new resource group name.
* **Region**: Select an Azure location, such as **East US**.

5\. Select **Review + Create**
6\. Select **Create**. It takes a few seconds to create a resource group.
7\. Select **Refresh** from the top menu to refresh the resource group list, and then select the newly created resource group to open it. Or select **Notification**(the bell icon) from the top, and then select **Go to resource group** to open the newly created resource group.

\
In Azure RBAC, to grant access, you assign an Azure role.
1. In the list of **Resource groups**, open the new **netbook** resource group.
2. In the navigation menu, click **Access control (IAM)**.
3. Click the **Role assignments** tab to see the current list of role assignments.

4\. Click **Add** > **Add role assignment**.
If you don't have permissions to assign roles, the Add role assignment option will be disabled.

5\. On the **Role** tab, select the **Contributor** role.
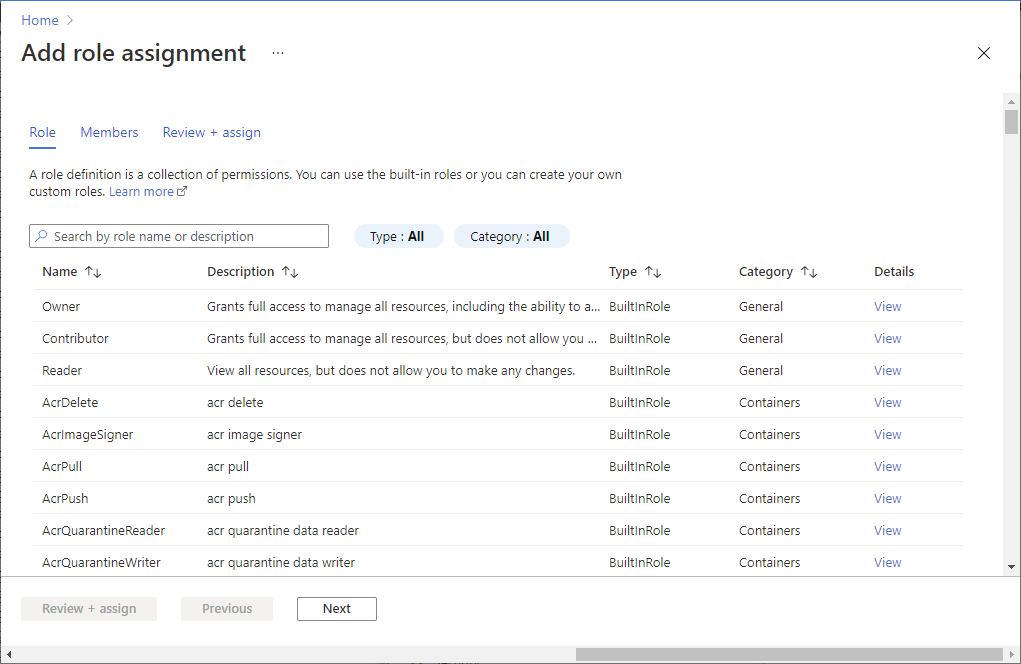
6\. On the **Members** tab, select yourself or another user.
7\. On the **Review + assign** tab, review the role assignment settings.
8\. Click **Review + assign** to assign the role.
After a few moments, the user is assigned the Virtual Machine Contributor role at the example-group resource group scope.